LanQiao Baseboard Development's log02
LanQiao Baseboard development’s log 02
PWM Output with Changeable Duty
PWM Generate and Output
PWM, simply regarded as square signal, is important in many aspects like motor driven or any thing that can change effect by the level of voltage. So how can we generate a PWM signal?
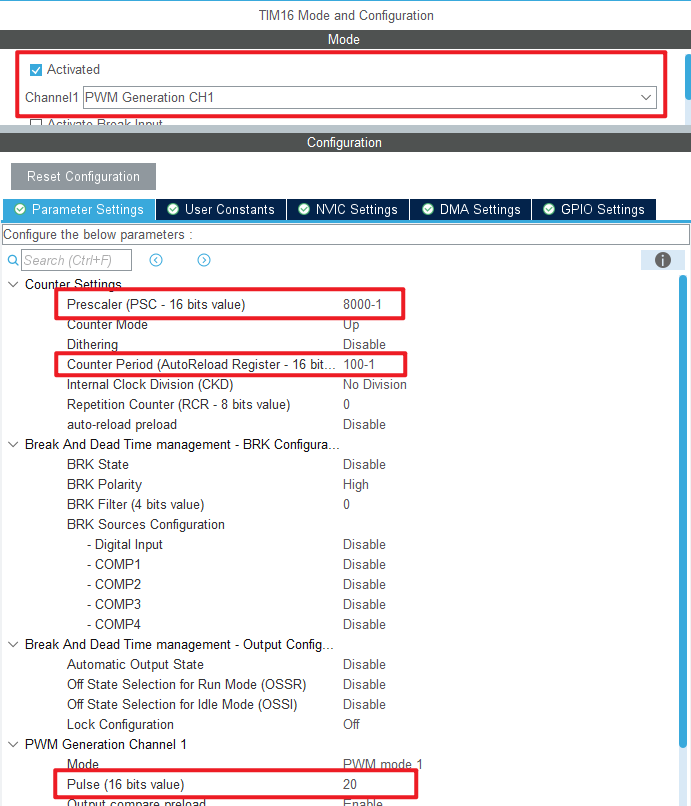
We can easily generate a PWM signal through our STM32’s TIM modules. The basic configure that you need to change is:
- First, Activate the TIM and choose a channel as PWM output channel. Attention! You need to choose CHx rather CHxN which means the reverse of a normal signal. It will output low voltage when a normal PWM output high voltage.
- Second, You should set the prescaler value and counter value. The TIM’s frequency is determined by the prescaler values, and the freq is $F_{pres} = \frac{F_{main}}{prescaler+1}$. And the real freq of TIM you choosed is the frequency of prescaler divided by the counter value plus one. $F = \frac{F_{pres}}{counter + 1}$.
- Third, the counter means how many count in one period. So you can set the pulse value which should be smaller than the counter because the value $\frac{pulse}{counter}$ is the duty of the PWM.
Above all is the basic configure of PWM settings.
Code and Application for PWM
To start TIM channel to output PWM with certain duty, you only need to start TIM with one code:
1 | HAL_TIM_PWM_Start(&htim16, TIM_CHANNEL_1); |
Here is two channels’ PWM output with different TIM and channels.
And now,let’s talk about ‘Duty’. What is duty and why is duty important? How can we change the duty of PWM generated by TIM.
Duty, is the percentage of high level in the total duration. As we all know that the capacity of driven is determined by high level, so if the duty gets larger, then the capacity is stronger, which means the LED will be lighter or the motor will rotate faster.
If you want change the lightness or the speed of cars, you can change the duty to achieve this. So how can we change it? We can change duty of certain TIM and certain channel by:
1 | __HAL_TIM_SetCompare(&htim16, TIM_CHANNEL_1, pwm1_duty); |
Param:
- &htimx : The TIM of your PWM channel
- TIM_CHANNEL_x : The Channel of your PWM
- pwmx_duty : the duty you want to set. Must smaller than the counter values.
You can define the values of different PWM output channels and apply key event to change duty. The exact code is as followed.
1 | if (keys[1].Ispress) |
How keys function with this code you can read the last blog’s pt.3. And due to the counter we set to 100, the duty(pulse) must be smaller than 100. And we concern about the death zone problem, which may cause low driven power problems, so we set the duty from 10 percentage to 90 percentage.
Moreover, we can achieve breathing LED by provide LED PWM with changed duty from low to high and from high to low.
1 | if (pwm_number == 1) |
The purpose of delay is to make the light of different duty visualize. And you can try the same code on motor, which effect is speeding up then slowing down.